Macro Photography
Objective/Goal:
1. The students will be able to define Macro Photography
2. Students will be able to identify the attributes which make a macro photograph.
3. Students will be able to define depth of field.
4. Students will create series of macro photographs using objects provided.
5. Students will use a variety of editing techniques in Photoshop on their pictures.
| macro1.pdf |
How to Take a Macro Photograph:
Why Macro Photography?
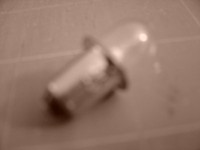
Have you ever taken a picture of something up close and its all blurry? Chances are you are getting too close or your subject (thing your photographing) is too small. See example below.
Why Macro Photography?
Have you ever taken a picture of something up close and its all blurry? Chances are you are getting too close or your subject (thing your photographing) is too small. See example below.
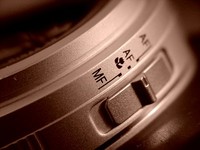
Step 1: Turn on Macro Mode (if your camera has it)
Most digital cameras have a macro mode. It is usually represented by the flower symbol (see photo below). The macro mode allows your digital camera to focus much closer than you normally could.
Most digital cameras have a macro mode. It is usually represented by the flower symbol (see photo below). The macro mode allows your digital camera to focus much closer than you normally could.

|
|
Step 2: Get as Close as You Can Without Blurring the Photo
Now you are ready to shoot the photograph. Move your digital camera toward the object. Use the auto-focus functionality to focus on the small object. Usually that's in the center of the image. If your camera can't achieve focus, that means your digital camera is too close to the object. Move the digital camera back and try again. That is probably the closest distance your camera focus on the object for a sharp photo. When your camera's auto-focus can lock-on the object, your photo will be clear and sharp.
Step 3: Shoot the Macro Photo
At the closest focus distance, focus and snap the photo. Don't worry about extra space around the object that you are capturing; in the next step, we will deal with the extra space. The important part is to capture a clear and sharp photo.
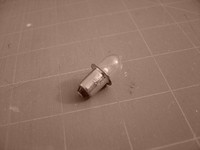
In the photo, the object doesn't fill the entire image frame. Therefore, the photo ended up with a lot of extra space around the object. You can hardly consider it as a macro shot. But, right now, the important part is that you've captured the object clearly.
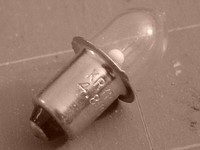
Step 4: Crop the Photo
If you were able to fill the entire image frame with the object you are capturing, then you don't need to crop the photo at all. But if the image has a lot of extra space, as shown in the previous step, that distracts from the object you are trying to portray, you should crop the photo down so that the object fills the entire image frame as shown in the photo below.
If you were able to fill the entire image frame with the object you are capturing, then you don't need to crop the photo at all. But if the image has a lot of extra space, as shown in the previous step, that distracts from the object you are trying to portray, you should crop the photo down so that the object fills the entire image frame as shown in the photo below.
Related Links:
Related Links:
Macro Photography for Beginners - Part 1
Macro Photography for Beginners - Part 2
National Geographic Macro Photography (Examples)
Fun with Macro Photography (DPS)
Macro Photography for Beginners - Part 1
Macro Photography for Beginners - Part 2
National Geographic Macro Photography (Examples)
Fun with Macro Photography (DPS)
Editing Your Macro Photography:
Step 1:
- Open your image in Photoshop
- Click "Filter" (on the top menu)
- Choose "Camera Raw Filter"

Focus on:
Contrast
Highlights
Shadows
Whites
Blacks
Clarity
Vibrance
Saturation
Contrast
Highlights
Shadows
Whites
Blacks
Clarity
Vibrance
Saturation
Step 2: Send/ Open in Photoshop and determine if you need to crop your image using the "crop tool"

Step 3: Adding Boarders Copy, paste and adjust layer options to achieve the desired look you want, use the borders below:


Step 4: Save files as jpeg
Step 5: Create new Album on Google Drive called "Macro" in your shared Photography folder
Step 6: Upload to Google Drive
Step 5: Create new Album on Google Drive called "Macro" in your shared Photography folder
Step 6: Upload to Google Drive
Link Disclaimer: The appearance of these links does not constitute endorsement by the Grand Island Central School District of the linked web sites, or the information, products or services contained therein. Grand Island Central School District does not exercise any control over the information you may find at these locations. Grand Island Central School District cannot attest to the accuracy or appropriateness of information available at any linked sites. The Grand Island Central School District is not responsible for contents of any linked pages or any link contained in a linked site or any changes or updates to such sites.
